Relative Alignment
Learning targets
- Align object relatively to another object
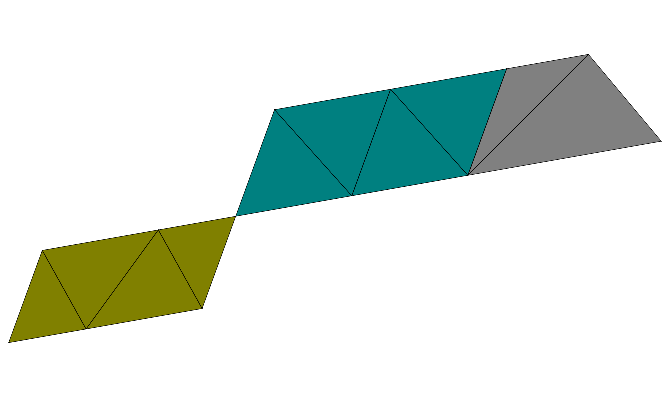
In this example we construct the following geometry by a relative alignment of the geometrical objects:
In the parent section 2D Concepts we already encountered the ports of a geometrical object. There we only made use of the ports’ positions within the local coordinate system of the geometrical object. We know show how we use the local coordinate system to glue geometrical objects together.
The ports of a parallelogram (and accordingly for a trapezoid) are shown in the following figure:
To glue another geometrical to this parallelogram, we select a port for the first domain and a port for the second domain. The second domain is then translated and rotated so that the local coordinates systems of both ports match. This is shown for a second parallelogram in the next figure where we used port Point3 for the first object and Point1 for the second parallelogram:
The syntax for this reads as
Parallelogram {
  Name = "P1"
  ...
}

Parallelogram {
  Name = "P2"
  Port = Point1
  Alignment {
    Parent {
      Domain = "P1"
      Port = Point3
    }
    Orientation = Parallel
  }
}
Within the section for the second parallelogram we address port Point1. The Alignment section causes a relative placement to the parent domain P1 and it’s port Point3.
With the flag Orientation we can declare if the ports’ local coordinate axes are parallel (Parallel) or are opposite to each other. To demonstrate this we add a third object (a trapezoid),
by the following declarations:
Parallelogram {
  Name = "P2"
  ...
}

Trapezoid {
  Name = "T1"
  Port = West
  Alignment {
    Parent {
      Domain = "P2"
      Port = East
    }
    Orientation = AntiParallel
  }
}
To generate the final geometry as shown at the beginning of this section, we rotate the first parallelogram by  . Due to the relative alignment of the second parallelogram and the trapezoid, these objects are rotated accordingly.
